|
阅读:8479回复:2
jsplumb插件更改线条颜色
此示例为主要代码,仅供参考
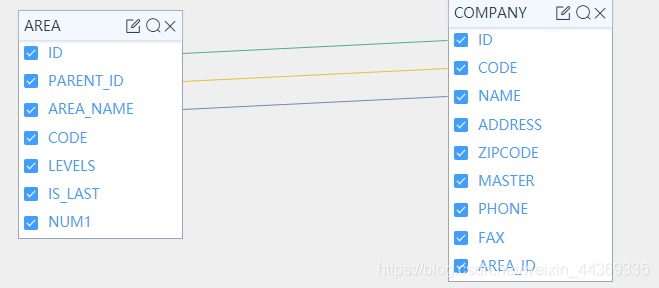
// 通过registerConnectionType定义样式,使用setType应用样式 jsPlumb.registerConnectionType('custom', {setting}) 连线.setType('custom') 示例: // 初始化jsplumb let jsplumb = this.$jsPlumb.getInstance() // 定义初始样式 let config = { paintStyle: {stroke: '#6C8AB6', strokeWidth: 1}, connectorStyle: {stroke: '#6C8AB6', strokeWidth: 1}, connectorHoverStyle: {stroke: '#6C8AB6', strokeWidth: 3 }, hoverPaintStyle: { stroke: '#6C8AB6', strokeWidth: 3 } } // 设置连线 let c = jsplumb .connect({ source: sourceId, target: targetId }, config) // 定义新样式 let setting = { paintStyle: {stroke: '#E9BE37', strokeWidth: 1}, connectorStyle: {stroke: '#E9BE37', strokeWidth: 1}, connectorHoverStyle: {stroke: '#E9BE37', strokeWidth: 3 }, hoverPaintStyle: { stroke: '#E9BE37', strokeWidth: 3 } } // 应用新样式 jsPlumb.registerConnectionType('custom', setting) c.setType('custom') 效果: 弹窗选择属性,确定后改变连线颜色  |
|
|
沙发#
发布于:2020-06-02 11:25
https://blog.csdn.net/weixin_44369335/article/details/90513126
如果你借鉴的是 xiaoka2017-easy-flow-master 代码, 苍穹任尔翔推荐您这么改: // 设置连线 let that = this let newsetting = { paintStyle: {stroke: '#46a6ff', strokeWidth: 1} } // 应用新样式 that.jsPlumb.registerConnectionType('custom', newsetting) conn.setType('custom') |
|
|
板凳#
发布于:2020-06-02 11:35
我曾试用:
debugger console.log(this.jsPlumb) 方法一: //let linestyle = document.getElementsByClassName(".jtk-overlay.flowLabel") //linestyle.style.border = "1px solid #46a6ff !important" 方法二: // let newpaintStyle = {stroke: '#46a6ff', strokeWidth: 1}, // this.jsPlumb.paintStyle = newpaintStyle 方法三: //定义新样式 // let setting = { // paintStyle: {stroke: '46a6ff', strokeWidth: 1}, // connectorStyle: {stroke: '#E9BE37', strokeWidth: 1}, // connectorHoverStyle: {stroke: '#E9BE37', strokeWidth: 3 }, // hoverPaintStyle: { stroke: '#E9BE37', strokeWidth: 3 } // } // 应用新样式 // this.jsPlumb.registerConnectionType('custom', setting) // this.jsPlumb.setType('custom') debugger 全都不生效,SHIT!!! |
|

